

Share Clients
If you have Integration enabled (via the Integration menu to the bottom-left of the screen) new records are automatically linked to the central client list. You may however have clients created prior to Integration activation that are required in the central list. The Share Clients option enables you to share these clients with the central client list.
Share clients with the central client list, as follows:
- Ensure all client records are closed and that Integration has been enabled via the menu to the bottom left of the screen:
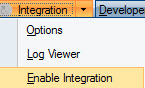
- Once Integration has been enabled the Integration drop-down menu will change and incorporate a Share Clients option:
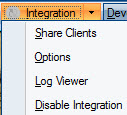
- Select Share Clients to open the Select clients to share dialog.
- Tick the clients that don't appear in the central client list.
- Click OK to open the Share Clients Wizard which will guide you through the sharing process.
- Click Next from the Welcome screen.
- Click Next to confirm the client selection.
- Select one of the two options:
- Prompt when required: This option prompts you of locked clients, or clients needing resolving, so they can be closed or imported before continuing.
- Skip clients requiring user interaction: This option enables you to transfer all selected clients that are not locked and do not have potential matches without further prompting. A summary is provided of the reason for any skipped clients.
- Click Next to review the number of clients shared via the Overview.
- Click Finish to activate the sharing process. If the client exactly matches an existing record it is automatically linked to the existing record and any additional details are merged, where applicable. If the client potentially matches an existing record a Resolve List dialog opens enabling you to identify and select a matching record. If the client does not match or potentially match an existing client in the central list, a new central client is created.
- The Client sharing complete dialog is shown summarising the successful and failed shares.
- Click Close to complete the share process. All successful clients have now been shared with the central client list and are now fully integrated. Fields that are only editable centrally, now appear as read-only in Digita Accounts Production Advanced and can be changed using the Edit button.
If the Resolve List dialog opens, tick the potential match identified or select Create New if the matches identified are not suitable and OK to continue with the sharing process.